Sooo...about that "feeling better" stuff...I wrote that post about an hour before I got the stomach flu and was out of commission for 24 hours. Who's ready for Spring and a healthy household?? {Brenna raises her hand}
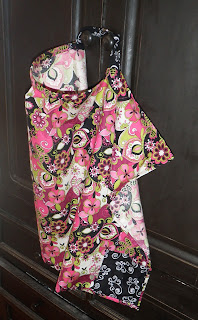
The good news is that before I got sick I did make my first craft of the week and I'm really happy with how it turned out. My cousin, Kelsey, is expecting a baby girl this July and asked me to make a nursing cover for her. I had never made one, so I scoured Pinterest for ideas. This ended up being a hodge-podge of different patterns, which I love because I took all my favorite elements of others and threw them together. Plus it was so easy! I think I'll be making more of these in the future.
Here's a little tutorial:
{Materials needed}
1 yard of fabric (for main piece)
*1/2 yard of 2nd fabric (for straps & pocket)
1-inch D rings
16 inches of 1/4-inch corset boning
1 baby washcloth
*You could use all the same fabric, in which case the one yard would be plenty, but I wanted a little variation, so I used a second.
Step 1: Cut the main piece to 26in.x38in. (as my assistant demonstrates below)
Step 2: Cut 2 straps out of second fabric;
The long strap should be 2.5in.x28in.
The short strap is 2.5in.x10in.
(Sippy cup is optional)
Step 3: Sew each strap by folding them, right sides together and stitching them shut.
I curved one end of my long strap, as you can see below.
Leave one end unstitched so you can turn them right-side-out.
Step 4: Fold the short strap in half and put the D rings in the middle.
Sew as close to the rings as you can.
Step 5: Next, press each edge of the main piece (not pictured).
I folded the bottom and side edges over about 1/4 inch two times
and the top edge I pressed at 1/4-inch and then another 1/2 inch.
This helped a lot with the next few steps.
Step 6: Cut the baby washcloth in half on the angle and place each half in one of the bottom corners, wrong sides together. Sew the bottom edge, followed by each side edge.
The corners will look like this:
Step 7: Place the boning inside the fold of the top edge, making sure the curve is facing the right way. My cover was 37 inches at this point, so I measured 10.5 inches in and pinned the boning in place.
Step 8: At this point, you can also pin the straps in place on either side of the boning and sew across the entire top edge in one step.
{I then I sewed the straps again to face the correct way (see the next two pictures)}.
{Optional} Step 9: I thought it would be handy to have a little pocket on the cover for nursing pads, burp cloths, etc., so I cut an extra square of my second fabric and sewed around three sides, making a cute, functional detail on one of the corners.
Here's the final product:


No comments:
Post a Comment