Monday, November 5, 2012

Craving Patterns

I recently came to a staggering realization that may explain why I am attracted to patterns and the idea of repetition and continuity: my life is severely lacking patterns and continuity.

The past three months have included: buying a house, moving into said house, painting, furnishing, and decorating said money pit house, teaching four classes {what genius ever agreed to that?}, dealing with multiple baby-sitting dilemmas, being rescued from those dilemmas by some stellar friends and family members, designing and printing my beautiful Honey Boo Boo's wedding invitations, reasoning with a toddler-turned-terrible-two-er, celebrating my H.B.B.'s wedding, learning to function with a mommy-obsessed monkey attached to my limbs, basically only seeing my husband on weekends {and sometimes not even then}, all whilst dealing with the beautiful disaster that is the first trimester of pregnancy.

This post is not meant to complain. I know we will look back at Fall 2012 as a time of huge transformations, most of them good. However, my tolerance for chaos has its boundaries and I think I am quickly approaching my limit. I am grasping desperately for any semblance of order in our schedule, but I keep coming up short. Every day is different. Every week is different. That's a hard thing to get used to {because getting used to something means that it's the same, right? hmm}.

If there is one thing I should have learned by now, it's that this feeling of helplessness is temporary. Having a sense of "control" has always been important for me and, in moments I'm really struggling, I often have to remind myself that I have the ability to control small aspects of my day. I can establish small patterns, even if it means reading a chapter in my book every night before I pass out {because "falling asleep" doesn't do what I do justice}, or writing a blog entry every Friday afternoon, or making sure that Saturday mornings are spent eating breakfast with my two favorite people. These might be the only patterns my life can handle right now, and I think that's fine for now. Yeah, I think I'll decide to be fine with that.

Wednesday, August 8, 2012

Being Active (and other pressing issues)

This summer has brought a surge of physical activity to our house. I'd like to blame our renewed interest in exercise on the fact that we both have the summer off of work and just can't wait to seize every extra moment we have to get outside and get fit...however, I must admit it has more to do with the London Olympics and my husband's belief that, given enough practice, he could be in the running for nearly every gold medal in the games. Recently, I have indulged his dreams by agreeing to play tennis a few times. 

Federer and Murray, we are not.

But it has been fun. And Gehrig loves running around after the balls that inevitably fly past us as we play. Mr. Curious also suckered us into getting him his own racquet...{no, we are not insane parents who think their 18-month-old will become a tennis prodigy...we simply discovered it's much more pleasant for him to traipse around on the sideline swinging aimlessly than to chase us around, arm outstretched, face wet, and perma-whining because we won't give him ours. It's a win for all parties}.


Now, to the pressing issue at hand. Guys, I finally ordered rollers for my press! It only took me two years...but these beauties should be on their way to my anxious little hands soon. Can't wait to ink them up and get-to-printing!
Source


Sunday, August 5, 2012

Let's get real...

My commitment to this blog has been lackluster at best. But it's about to get reeeal interesting up in here, folks. The Burghardts bought themselves a house! {I think a "Welcome to Adulthood" party may be necessary}. Jason and I have lived in 5 (!!) cities in the past 4 years. This is not something I'm exactly proud of, but there it is. While it has made me a master-mover {I'll soon be posting my best moving tips}, I'm thrilled to say this will be our last time for a whiiiile {granted, our record for staying in one house is 18 months, so it won't take much to make us feel like permanent residents}. 

It's time to kick things into high gear as we'll be moving over the next 6 weeks or so {why-oh-why must this process take for.e.ver?}...Get ready for some serious organizing/decorating/pinterest-ing on this here little space of the intra-net. 

In the meantime, I'll leave you with my favorite picture of G as of late...gazing into his bright future, now that his parents are real adults.


For more photos of our recent vacation, go here.


Wednesday, July 4, 2012

Coffee Table Makeover

I've been eyeing some beautiful coffee table/ottomans on Pinterest for a while now (see here and here), and I knew I had to do something with this horrible coffee table we got from IKEA shortly after our wedding. I've hated this thing for almost four years now - especially because when we took it out to put it together (the day we bought it), we realized it had a huge gash right on the edge. Call it laziness, or the fact that it only cost us $20 to begin with, but we just never bothered to replace it. So there it sat in our living room - taunting me with that ugly gash.

So, the time has finally come to make myself a pretty coffee table.
The results?
I'm quite pleased!

Now here's the how-to:
{Please ignore the ridiculous clutter in these photos. I apparently have learned to walk through my living room with a blind eye and somehow avoid walking on puzzle pieces and whiffle balls, but these pictures are a sad reality of what my house looks like. All the time.}


Step 1: I wanted six buttons on my ottoman, so I used a button-cover kit from Joanns to make them (not pictured), then marked where they needed to go and made the mister drill holes for me (thanks, hubs!)


Step 2: Cut 2-inch foam to fit the top of table. I then covered the foam in batting (not pictured) and marked where my buttons would go again.


Step 3: Use upholstery thread to attach the buttons. I tied the thread to regular plastic buttons on the underside of the table to make them taught (you can kind of see this a few pictures down)
{Note: Use a LONG needle for this part. Mine was not long enough, so this part involved far more effort, time, and frustration than it needed to.}

In case you wondered what I look like at 1 in the morning,
wrestling with buttons...wonder no more!
Success with tufted buttons! 
Step 4: {Take legs off if possible} Use a staple gun to attach fabric, pulling extra tight as you go.
Start in the middle of each side and work out to the corners. Don't do one side at a time. Staple opposite sides, making staples in line with each other as you go.
The corners were tricky. Just work slowly and make a clean fold. I watched some videos on YouTube to get some idea of how to do it...

^See the plastic buttons?
Step 5: Trim extra fabric, reattach legs, and marvel at your new ottoman!


I'm pretty happy with how it turned out. 
We have another shelf that goes underneath that I'll add as soon as I find the pegs for it.
And I also need to get a fancy tray like those beauties on Pinterest.
But for now, at least I don't have to stare at that gash anymore!

Wednesday, March 7, 2012

Spring Break Craft #1

Sooo...about that "feeling better" stuff...I wrote that post about an hour before I got the stomach flu and was out of commission for 24 hours. Who's ready for Spring and a healthy household?? {Brenna raises her hand}

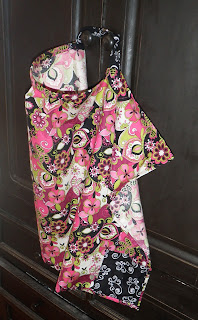
The good news is that before I got sick I did make my first craft of the week and I'm really happy with how it turned out. My cousin, Kelsey, is expecting a baby girl this July and asked me to make a nursing cover for her. I had never made one, so I scoured Pinterest for ideas. This ended up being a hodge-podge of different patterns, which I love because I took all my favorite elements of others and threw them together. Plus it was so easy! I think I'll be making more of these in the future.

Here's a little tutorial:

{Materials needed}
1 yard of fabric (for main piece)
*1/2 yard of 2nd fabric (for straps & pocket)
1-inch D rings
16 inches of 1/4-inch corset boning
1 baby washcloth

*You could use all the same fabric, in which case the one yard would be plenty, but I wanted a little variation, so I used a second.


Step 1: Cut the main piece to 26in.x38in. (as my assistant demonstrates below)


Step 2: Cut 2 straps out of second fabric; 
The long strap should be 2.5in.x28in.
The short strap is 2.5in.x10in.
(Sippy cup is optional)


Step 3: Sew each strap by folding them, right sides together and stitching them shut.
I curved one end of my long strap, as you can see below.
Leave one end unstitched so you can turn them right-side-out.


Step 4: Fold the short strap in half and put the D rings in the middle.
Sew as close to the rings as you can.


Step 5: Next, press each edge of the main piece (not pictured). 
I folded the bottom and side edges over about 1/4 inch two times 
and the top edge I pressed at 1/4-inch and then another 1/2 inch. 
This helped a lot with the next few steps.

Step 6: Cut the baby washcloth in half on the angle and place each half in one of the bottom corners, wrong sides together. Sew the bottom edge, followed by each side edge.
The corners will look like this:


Step 7: Place the boning inside the fold of the top edge, making sure the curve is facing the right way. My cover was 37 inches at this point, so I measured 10.5 inches in and pinned the boning in place.


Step 8: At this point, you can also pin the straps in place on either side of the boning and sew across the entire top edge in one step. 
{I then I sewed the straps again to face the correct way (see the next two pictures)}.


{Optional} Step 9: I thought it would be handy to have a little pocket on the cover for nursing pads, burp cloths, etc., so I cut an extra square of my second fabric and sewed around three sides, making a cute, functional detail on one of the corners.

Here's the final product:

Tuesday, March 6, 2012

Spring Break Goals

I won't lie. I'm tired. The past two weeks were filled with colds, fevers, and ear infections. And with work and several visits from family and friends piled on top of that, I was beginning to feel like I couldn't stretch much further. Thankfully, this week is my Spring Break and it couldn't have come at a better time.

So, now that I'm feeling more rested and a little less stressed, I decided to use this week to get some projects done at home that I've been wanting to do for a while. My goal is to do one craft project every day this week...all those Pinterest ideas need to get done sometime, right??

I'll share my projects as I get them done. I'm so looking forward to kickstarting this organization/productivity/motivation makeover! Looks like Spring Break has me energized already!

Monday, March 5, 2012

Why This Blog?

I've always prided myself and my little family on being easy going and laid back. I've never really been high maintenance or anal retentive, which up until recently I thought was a great thing. Since having a baby, though, I have started to recognize how this might be seen as a flaw. And as my baby becomes less of a baby and more of a toddler, I'm starting to recognize areas of my life that could greatly benefit from a little anal retentiveness.

My days are often unpredictable with a 13-month old, so being flexible is a job requirement. But the time has come for me to establish some structure in my house. I'm not talking about nap or bedtimes...we've got those down. It's the little things...the habits...the patterns...that help make a house run more smoothly that I need to work on.

I plan on focusing on several different areas, including meals, budgets, home organization, and crafts. I'm sure more topics will come up along the way, but I think these will keep me occupied for a while!

I decided to start this blog to track my progress and, let's face it, hold me accountable to actually achieving this goal. I need a place to document my ideas and share my accomplishments.

Welcome to my blog! I hope you enjoy!